30 May 2011

Cara Mereset Ulang Waktu Billing Warnet


Sudah Banyak postingan yang membahas tentang bagaimana Membobol billing expore yang digunakan di warnet2. saya minta sory dulu pada master2 karna postingan saya agak jadul ato sudah ketinggalan jaman, maklum masih newbie

ok kita mulai aje


Pertama-tama Bukan run dengan menekan CTRL+R, kemudian ketikan cmd.
ketik "Time"pada layar cmd, akat keluar perintah Enter New Time, nah disini kita mulai mereset waktu billing warnetnya.
time waktu yang ingin gan2 tentukan
contohnya:
The Current time is :14:23:07:12 (maka kita umah menjadi)
Enter New Time: 12:20:11:10
kemudian tekan enter

Maka time billing warnet sudah diubah, jika berasil gan bisa liat time billing di billing windows.


PERHATIAN: Tutorial ini tibuat untuk membuktikan bahwa tidak ada security yang ampuh hingga 100%, maka dari itu jangan gunakan ilmu yang kalian miliki untuk kejahatan


sumber :  http://www.whiteball.co.cc/

Download Free Vienna Transformation Pack For Windows XP

Bagi Anda yang masih menggunakan windows xp tapi ingin merubah tampilan windows anda menjadi seperti windows 7, dibawah ini ada beberapa link untuk mendownload softwarenya:

1. Vienna Transformation Pack 2.5
windows 7 transformation pack-vienna 25 screenshot
Download Vienna 2.5 – Windows 7 Transformation Pack (Mirror)

2. HFN Windows Transformation Pack
windows 7 transformation pack - hfn for xp user
Download HFN Windows 7 Transformation Pack

3. NSFormation Pack 1.0
windows 7 transformation pack-nsformation for windows XP
Download Windows 7 Transformation pack – NSFormation (Mirror)

4. Vienna Transformation Pack v1
windows 7 transformation pack - vtn_v1 for windows 7
Download Vienna Transformation Pack v1
Via SizzledCore

Download Gratis Windows Xp Vienna Edition Activated | 644MB

undefined
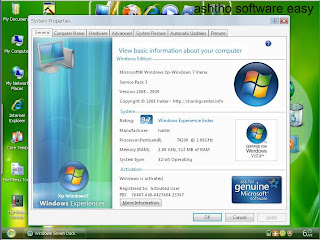
Windows XP SP3 Viena Edition 2009 Activated | 644MB

Windows XP SP3 dengan Gaya Viena dan dukungan Laptop dan SATA. Tidak menuntut aktivasi. Dapat melakukan update secara online dari MS situs resmi.  Kombinasi Edisi Final Xp-Vista dengan 25 Tema dan Windows 7 Edition (Visual Effects).

Jangan gunakan lagi Service Packs lama seperti  1 or 2,
XP baru saja merilis
Viena Edition 2009

System Requirements:
o You clearly need a Boot Disk
o Particularly if your Hard Disk Crashed
o You can Repair Windows issues
o Now you have a Windows XP PRO disk available
o Upgrade older machines
o Be the Go To Guru in your circle of friends!

* The ESSENTIAL TOOL you need: a BOOTABLE SYSTEM DISK
* Micro Soft Designed this Windows platform for:
o Reliability
o Security
o Privacy
o High performance
o Ease of use

* Factory Themes & Integration
o Fabulous 2009 Vienna look
o Customize your graphics
o Great Themes
o Complete Windows Integration


* Full Install for a complete system
* Hot Fixes all up to date
* Fully WGA Activated, no need to call it in
* No 30 day hassle
* Valid CD-Key per Microsoft

Windows XP operating system provides multiple benefits for:
* Business installations
* & Home users
o A clean look
o Simple desktop
o Rock-solid reliability
o Easy-to-use features

* Join the digital age, harness the value of Windows XP
* Service Pack 3 features enhancements in:
o Real-time voice
o Video
o Data communications

* XP PRO allows the PC to become a center of communications
* Provides creative social interaction beyond just e-mail and instant messaging
* Windows XP allows the user to connect back to the desktop from any location
* Support for new wireless networks is already built in
* XP PRO is a essential necessity for running:
o Microsoft SQL Server
o Internet Information Server, IIS
o Microsoft Databases
o and for Broadcasting your own web Pages

undefined

undefined

undefined
undefined 


Cara Membuat Recent Post Berjalan Kiri/Kanan

Membuat recent post berjalan adalah menjadikan beberapa judul postingan dalam label blog Sobat pada sebuah gadget blospot (HTML/JavaScript), yang bisanya berjejer ke bawah dibuat menjadi berjalan dari sebelah kiri dan bisa juga dari sebelah kanan.
Mungkin Sobat blog tertarik dan ingin mencobanya. Recent post berjalan ini sangat bagus ditempatkan dibawah header ataupun bisa juga di footer dengan lebar gadget maximal seperti lebar halaman weblog Sobat.

Langsung saja cara membuatnya adalah sebagai berikut :

  • Masuk ke halaman Dasboard > Tata Letak (Rancangan) > Elemen Laman
  • Tambah gadget elemen HTML/JavaScript
  • Copy kode berikut dan paste pada elemen HTML/JavaScript tersebut


<script type='text/javascript'>
//<![CDATA[
function RecentPostsScrollerv2(json)
{
var sHeadLines;
var sPostURL;
var objPost;
var sMoqueeHTMLStart;
var sMoqueeHTMLEnd;
var sPoweredBy;
var sHeadlineTerminator;
var sPostLinkLocation;
try
{
sMoqueeHTMLStart = "\<MARQUEE onmouseover=\"this.stop();\" onmouseout=\"this.start();\" ";
if( nWidth)
{
sMoqueeHTMLStart = sMoqueeHTMLStart + " width = \"" + nWidth + "%\"";
}
else
{
sMoqueeHTMLStart = sMoqueeHTMLStart + " width = \"100%\"";
}

if( nScrollDelay)

{
sMoqueeHTMLStart = sMoqueeHTMLStart + " scrolldelay = \"" + nScrollDelay + "\"";
}
if(sDirection)
{
sMoqueeHTMLStart = sMoqueeHTMLStart + " direction = \"" + sDirection + "\"";
if(sDirection == "top" || sDirection =="bottom")
{
//For left and right directions seperate the headilnes by two spaces.
sHeadlineTerminator = "&nbsp;&nbsp;";
}
else
{
//For down and up directions seperate headlines by new line
sHeadlineTerminator = "\<br/\>";
}
}
if(sOpenLinkLocation =="N")
{
sPostLinkLocation = " target= \"_blank\" ";
}
else
{
sPostLinkLocation = " ";
}
sMoqueeHTMLEnd = "\</MARQUEE\>"
sHeadLines = "";
for(var nFeedCounter = 0; nFeedCounter < nMaxPosts; nFeedCounter++)
{
objPost = json.feed.entry[nFeedCounter];
for (var nCounter = 0; nCounter < objPost.link.length; nCounter++)
{
if (objPost.link[nCounter].rel == 'alternate')
{
sPostURL = objPost.link[nCounter].href;
break;
}
}

sHeadLines = sHeadLines + "\<b\>"+sBulletChar+"\</b\> \<a " + sPostLinkLocation + " href=\"" + sPostURL + "\">" + objPost.title.$t + "\</a\>" + sHeadlineTerminator;

}
document.write(sMoqueeHTMLStart + sHeadLines + sMoqueeHTMLEnd )
}
catch(exception)
{
alert(exception);
}
}
//]]>
</script>

<script style="text/javascript"> var nMaxPosts =
20; var sBgColor; var nWidth; var nScrollDelay = 180; var sDirection="top"; var sOpenLinkLocation="Y"; var sBulletChar="�"; </script> <script style="text/javascript" src="http://namablogSOBAT.blogspot.com/feeds/posts/default?alt=json-in-script&callback=RecentPostsScrollerv2"></script>

Keterangan :
  • Ganti kode yang berwarna merah dengan alamat blog sobat.
  • var nMaxPosts = 20 adalah jumlah postingan terakhir.
  • var nScrollDelay = 180 adalah kecepatan text.
  • var sDirection="left" untuk text berjalan dari kanan ke kiri, ganti dengan "right" jika ingin text tersebut berjalan dari kiri ke kanan.
  • var sOpenLinkLocation="Y" untuk link pada halaman yang sama, ganti dengan "N" untuk membuka link pada jendela baru (new tab).
  • var sBulletChar="•" adalah icon kecil pada bagian depan setiap link, bisa diganti dengan apa saja sesuai selera.
Selamat Mencoba...